App Inventor Chart Components: Project Summary
In the previous post on the App Inventor Chart Components project, we have looked at an extensive description of Chart Data Source concepts and realizations of Data Source importing via TinyDB and CloudDB components. This blog post will follow up on the post by covering CSV, JSON and Online data importing implementations to the Chart Data component.
We will first start by taking a look at importing from files. More specifically, CSV and JSON formatted files. Before we start going into the actual details of how the importing itself will function, let’s first take a look at the CSV and JSON formats themselves.
The CSV format looks as follows:
X,Y,Z
1,2,3
2,3,4
3,4,5
4,5,6
5,6,7
A CSV file consists of multiple rows, where each row’s element is separated by a comma.
When importing Data from a CSV formatted file, we interpret the very first row as the “header” of the file. This is a row which basically contains the names of the columns themselves.
It is also important to note that in our case, we are more interested in the columns than the rows. We may consider each column as a single array, so in the case of the example, the X column would be the following:
X
1
2
3
4
5The JSON (JavaScript Object Notation) equivalent of the CSV example is the following:
{
    "X": [1,2,3,4,5],
    "Y": [2,3,4,5,6],
    "Z": [3,4,5,6,7]
}
In the JSON format, each value is essentially a key-value pair. We will interpret the key as the name of the element (much like the column name in the CSV file), and the value as the element (or elements, if the element is an array).
More information on the JSON format can be found here.
With the formats of the supported Files established, let’s take a look at the actual process of the importing.
One important characteristic to note of CSV Files is that, in fact, the data is interpreted on a row-by-row or a column-by-column basis. What this means for us is that we essentially have to operate on data on a per-column or per-row basis, while our data requirements are actually more than a single column of data, since we make use of tuples which hold the x and the y value (for the 2-dimensional Data scenario)
However, this is not quite the case for JSON formatted files, which allow nested Lists. However, due to the nature of data (mostly data will most likely come in an array rather than a nested List containing both x and y values), we will apply the same ideas to JSON data parsing as we do to CSV data parsing.
The conclusion is then as follows – since we are operating on individual columns, we will need to allow selection of columns for each dimension of the Data. If the data consists of tuples containing x and y entries, we should allow picking a column for both x and y, and then combine the two columns to create the entries. If the data consists of 3 dimensions (x, y and z entries), then we should allow to pick a column for both the x, the y and the z dimension.
The following concept representation of a CSVFile specialized component (which is now adapted to support JSON as well) illustrates the process with an example:

Let us now look at each piece of the process in depth.
The DataFile component (then CSVFile, as in the example) is a non-visible component which is able to read in files, parse their contents from CSV/JSON to generate rows, columns and column names, which are then stored internally. These properties can then be fetched and made use of by the Chart Data components.
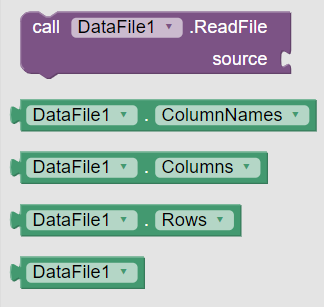
In App Inventor, the properties and the blocks of the component look as follows:
The DataFile importing process in blocks is quite similar to the shown CSVFile implementation:
Alternatively, instead of the first block which changes the Source, the file can be set via Designer properties.
Most of the heavy lifting is, in fact, done by the DataFile. The reading in the code is done as follows:
Firstly, the Source File is specified, and then the method to read from the File is invoked:
    public void ReadFile(String source) {
        this.sourceFile = source;

        readFromFile(sourceFile);
    }
Afterwards, the File itself is opened and then the AsyncRead command is issued, as follows:
  protected void readFromFile(final String fileName) {
        form.askPermission(Manifest.permission.READ_EXTERNAL_STORAGE, new PermissionResultHandler() {
            @Override
            public void HandlePermissionResponse(String permission, boolean granted) {
                if (granted) {
                    // ... (exception try)
                        InputStream inputStream;

                        if (fileName.startsWith("//")) {
                            inputStream = form.openAsset(fileName.substring(2));
                        } else {
                            String filepath = AbsoluteFileName(fileName);
                            Log.d(LOG_TAG, "filepath = " + filepath);
                            inputStream = FileUtil.openFile(filepath);
                        }

                        final InputStream asyncInputStream = inputStream;

                        // Read file contents asynchronously
                        AsyncRead(inputStream, fileName);
                // ... (exception catching)
            }
        });
    }
  }
The details of the InputStream creation from the File logic is not as important here. The same implementation is used as in the previously existing File component.
Finally, the File itself is read asynchronously, as follows:
    protected void AsyncRead(final InputStream inputStream, final String fileName) {
        // Add runnable to the Single Thread runner to read File asynchronously
        threadRunner.execute(new Runnable() {
            @Override
            public void run() {
                try {
                    // Parse InputStream to String
                    final String result = readFromInputStream(inputStream);

                    // First character is a curly bracket; Assume JSON
                    if (result.charAt(0) == '{') {
                        try {
                            // Parse columns from the result
                            columns = JsonUtil.getColumnsFromJSON(result);

                            // Construct row lists from columns
                            rows = ChartDataSourceUtil.getTranspose(columns);
                        } catch (JSONException e) {
                            // JSON parsing failed; Fallback to CSV
                            rows = CsvUtil.fromCsvTable(result);
                            columns = ChartDataSourceUtil.getTranspose(rows);
                        }
                    } else { // Assume CSV otherwise
                        // Parse rows from the result
                        rows = CsvUtil.fromCsvTable(result);

                        // Construct column lists from rows
                        columns = ChartDataSourceUtil.getTranspose(rows);
                    }

                    // If rows size is non-zero, set column names to first row. Otherwise,
                    // set it to an empty List.
                    columnNames = (rows.size() > 0) ? ((YailList)rows.getObject(0)) : new YailList();
                } catch (IOException e) {
                    e.printStackTrace();
                } catch (Exception e) {
                    e.printStackTrace();
                }
            }
        });
    }
The following happens here:
After this process is over, the data is ready to be imported to the Chart.
An important part of CSV/JSON parsing is the algorithm which retrieves the transpose of the rows/columns. The code, in it’s entirety, looks as follows:
  /**
   * Returns the transpose of the specified matrix (List of Lists)
   * The specified YailList parameter is expected to contain nested
   * YailList entries. Invalid entries are simply ignored.
   *
   * The method is used to convert a List of rows to a List of
   * columns and vice versa (the transpose)
   *
   * @param matrix  Matrix to return the transpose of
   * @return  Transpose of the specified matrix.
   */
  public static YailList getTranspose(YailList matrix) {
    // Determine the maximum entry count of the matrix
    int entries = determineMaximumListSize(matrix);

    List<YailList> result = new ArrayList<YailList>();

    for (int i = 0; i < entries; ++i) {
      // Get the i-th transpose entry and add it to the
      // result List. This essentially constructs the
      // i-th column or row entry (depending on the List passed in)
      YailList listEntries = getTransposeEntry(matrix, i);
      result.add(listEntries);
    }

    // Convert the result to a YailList
    return YailList.makeList(result);
  }

  /**
   * Constructs and returns a transpose entry from the given matrix
   * with the given index.
   *
   * The index represents the entry required. If the matrix is a List
   * of rows, the index represents the number of the column to return.
   * If the matrix is a List of columns, the index represents the
   * number of the row to return.
   *
   * @param matrix  Matrix to return the transpose entry of
   * @param index  The index of the entry to return
   * @return  The index-th transpose entry of the matrix
   */
  private static YailList getTransposeEntry(YailList matrix, int index) {
    List<String> entries = new ArrayList<String>();

    for (int i = 0; i < matrix.size(); ++i) {
      // Get the i-th matrix entry
      YailList matrixEntry = (YailList) matrix.getObject(i); // Safe cast

      // Ensure that the entry has the required index value
      // (this handles un-even list case)
      if (matrixEntry.size() > index) {
        // Each index-th element is added from all the matrix entries
        // to create the transpose entry
        entries.add((matrixEntry.getString(index)));
      } else { // Entry does not exist
        // Add blank entry
        entries.add("");
      }
    }

    return YailList.makeList(entries);
  }
When calling the transpose method, the expected input is a matrix (or, in other words, an n x m table, where n is the height, and m is the width), meaning that the argument should be a List of Lists (which is indeed the case for our parsed rows/columns). In the method itself, each List is treated as if it were the same size, even if that is not the case. To compensate for the missing entries of smaller Lists, blank entries are added to specify that the value does not exist in that position.
The List size that is applied in generating the transpose is the maximum List size of the nested Lists in the matrix.
The first important fact to note is that when getting the transpose, the width and height interchange. For example, if the matrix consisted of 3 columns, each having 5 rows, the transpose will consist of 5 columns, each having 3 rows.
This is what happens in the getTranspose method – first, the maximum entry count within the matrix’s nested Lists is calculated. If the matrix is a List of columns, this calculates the general row size to apply for the matrix.
The second important fact is that the transpose interchanges a row with a column. This is what is done in the getTranspose method’s loop. Consider the example of a List of columns; If there are 5 columns with a row size of 3, in the end the transpose will have 3 columns with a row size of 5 each. In this case, the method takes care of generating the 3 columns, one-by-one, using the getTransposeEntry method.
The getTransposeEntry essentially shifts all the elements from each List of the matrix to a new List. All of the matrix’s inner Lists are iterated, and then the index-th value is added, if it exists.
The following example illustrates this concept further:
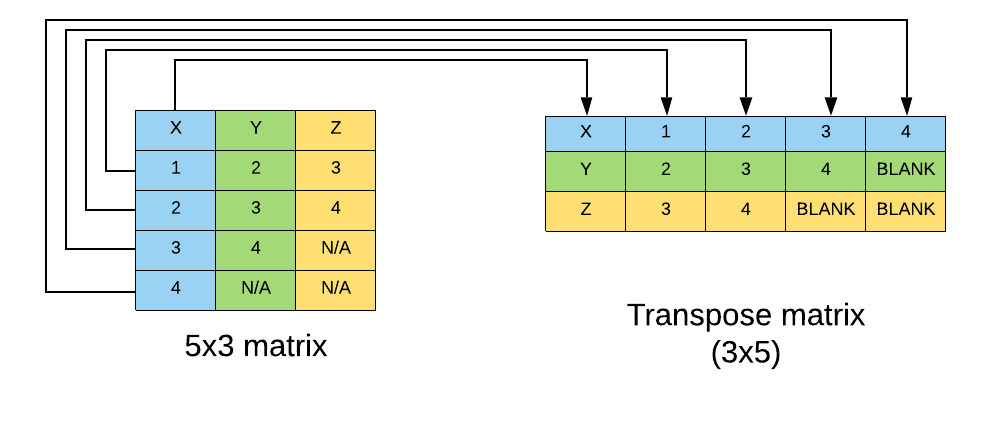
Note how the 5x3 matrix becomes a 3x5 matrix. The most important operation is the shifting of data itself; Note how all the elements from the first column in the original matrix are then put into the first row of the transpose matrix. This is exactly what this method handles, and allows us to create columns from rows.
While the CSV parsing is relatively straight forward (the rows are parsed in order, and the transpose is taken to retrieve the columns), JSON parsing becomes a bit more interesting.
The following method handles parsing a JSON formatted String to return a YailList of columns:
  /**
   * Parses the specified JSON and returns a List of columns.
   * A column consists of the key and all the entries
   * of the value itself. Each column is a YailList.
   *
   * E.g. "x: 5" would be a List (x 5), while
   * "y: [1,2,3]" would be a List (y 1 2 3)
   *
   * @param json  JSON string to parse
   * @return  YailList of columns, where each entry is a YailList
   */
  public static YailList getColumnsFromJSON(String json) throws JSONException {
    // Parse object from JSON object
    Object jsonObject = getObjectFromJson(json);

    // Generate columns from parsed JSON object.
    // Only proceed with column generation logic if the parsed
    // object is a List. Otherwise, return empty columns
    List<YailList> resultColumns = new ArrayList<YailList>();

    // JSON object is expected to be of type ArrayList.
    // If that is not the case, parsing is not done.
    if (jsonObject instanceof List) {
      // Cast parsed object to List, which represents
      // all the JSON entries
      List jsonList = (List) jsonObject;

      for (Object entry : jsonList) {
        List<String> columnElements = new ArrayList<String>();

        // Expected type of the entry is a List (key, value pair)
        // If this is not the case, add nothing to the column elements.
        if (entry instanceof List) {
          List listEntry = (List) entry;

          // Add first value as a String to the column elements
          // List. The first entry should always be a String,
          // since it is the key.
          columnElements.add(listEntry.get(0).toString());

          // Get the value of the key-value pair
          Object jsonValue = listEntry.get(1);

          // List types require different handling
          if (jsonValue instanceof List) {
            // If the value is a List, then add all
            // entries to the column
            List jsonValueList = (List)jsonValue;

            for (Object jsonValueListEntry : jsonValueList) {
              columnElements.add(jsonValueListEntry.toString());
            }
          } else {
            // If the value is not a List, then convert the value to a String and add it.
            columnElements.add(jsonValue.toString());
          }
        }

        // Convert parsed column elements to YailList, and add
        // the column to the resulting columns list
        resultColumns.add(YailList.makeList(columnElements));
      }
    }

    // Construct and return a YailList from the resulting columns
    return YailList.makeList(resultColumns);
  }
The first important thing to note are the List checks. In App Inventor’s JSONUtils, a JSON object which contains both the Key and the Value is a List. Therefore, we are expecting formats as follows:
{
    "object1": value1,
    "object2": value2
}
Note that the outermost curly brackets represent an object – they hold all the necessary key-value pairs inside (hence the List check, since the outermost object is a List of Objects).
The inner objects consist of both a key and a value pair ((object1, value1) for instance), hence the List check on each entry of the outermost object.
Next, it is important to note that each key-value pair is interpreted as a column, where the key is the column name. In this case, “object1” would the column name, and the values of value1 would be the values.
The algorithm for constructing a single column is as follows
With this established interpretation of JSON files in mind, we are then able to establish consistency between JSON and CSV parsed files. In the future, it might also be a good idea to also support some more natural JSON representations of the data, such as the following:
{
    "tuples": [
        {
            "x": 5,
            "y": 3
        },
        {
            "x": 7,
            "y": 1
        }
    ]
}
However, this would require some sort of deviation from the DataFile functionality on its own, and would require far different handling for JSON and CSV respectively.
In a previous post, I have defined Chart Data Source concepts to ease implementing new Chart Data Sources and create consistency between Chart Data importing from components.
Since the DataFile is also a possible Chart Data Source, we will define it as such:
public class DataFile extends FileBase implements ChartDataSource<YailList, Future<YailList>>
{
    // ...
}
This time, the key value of the ChartDataSource is a YailList. Here, the key denotes the columns to retrieve from the Data Source itself (the elements of the YailList are expected to be String). The returned value is also a YailList (each List entry representing a column), but wrapped in a Future object due to data retrieval being processed asynchronously.
The implemented method to retrieve a Data Value with the key then look as follows:
    public Future<YailList> getDataValue(final YailList columns) {
        // Submit a callable which constructs the results.
        // The callable is only executed after all the previous
        // tasks have been completed.
        return threadRunner.submit(new Callable<YailList>() {
            @Override
            public YailList call() {
                ArrayList<YailList> resultingColumns = new ArrayList<YailList>();

                // Iterate over the specified column names
                for (int i = 0; i < columns.size(); ++i) {
                    // Get and add the specified column to the resulting columns list
                    String columnName = columns.getString(i);
                    YailList column = getColumn(columnName);
                    resultingColumns.add(column);
                }

                // Convert result to a YailList and return it
                YailList csvColumns = YailList.makeList(resultingColumns);
                return csvColumns;
            }
        });

    /**
     * Gets the specified column's elements as a YailList.
     *
     * @param column  name of column
     * @return YailList of elements in the column
     */
    public YailList getColumn(String column) {
        // Get the index of the column (first row - column names)
        // 1 is subtracted from the index since YailList indexOf
        // returns an index that is 1-based.
        int index = columnNames.indexOf(column) - 1;

        // Column not found
        if (index < 0) {
            return new YailList();
        }

        return (YailList)columns.getObject(index);
    }
}
A runnable is submitted to the single-threaded runner to run the data retrieval in order. Since data parsing is also submitted to this single-threaded runner, we can ensure that the correct data will be present in the DataFile.
Each column is then retrieved one by one, and added to a resulting List. If a column is not found, it is substituted by an empty List and left up for interpretation to the Chart Data components.
After the DataFile does the parsing, the next step is importing the Data itself. The importing is invoked as follows:
    protected void importFromDataFileAsync(final DataFile dataFile, YailList columns) {
        // Get the Future object representing the columns in the DataFile component.
        final Future<YailList> dataFileColumns = dataFile.getDataValue(columns);


        // Import the data from the Data file asynchronously
        threadRunner.execute(new Runnable() {
            @Override
            public void run() {
                YailList dataResult = null;

                // ... (try-catch block omitted)
                // Get the columns from the DataFile. The retrieval of
                // the result is blocking, so it will first wait for
                // the reading to be processed.
                dataResult = dataFileColumns.get();

                // Import from Data file with the specified parameters
                chartDataModel.importFromColumns(dataResult);

                // Refresh the Chart after import
                refreshChart();
            }
        });
    }
Note how the Future object is retrieved outside the asynchronously executed Runnable block (to preserve ordering of value retrieval).
After the value itself is retrieved in the asynchronous Runnable, the Chart Data Model takes care of importing the retrieved columns.
    /**
     * Imports data from the specified list of columns.
     * Tuples are formed from the rows of the combined
     * columns in order of the columns.
     *
     * The first element is skipped, since it is assumed that it
     * is the column name.
     *
     * @param columns  columns to import data from
     */
    public void importFromColumns(YailList columns) {
        // Get a YailList of tuples from the specified columns
        YailList tuples = getTuplesFromColumns(columns);

        // Use the generated tuple list in the importFromList method to
        // import the data.
        importFromList(tuples);
    }

    /**
     * Constructs and returns a List of tuples from the specified Columns List.
     * The Columns List is expected to be a List containing Lists, where each
     * List corresponds to a column, the first entry of which is the header/name
     * of the column (hence it is skipped in generating data)
     *
     * @param columns  List of columns to generate tuples from
     * @return  Generated List of tuples from the columns
     */
    public YailList getTuplesFromColumns(YailList columns) {
        // Determine the (maximum) row count of the specified columns
        int rows = ChartDataSourceUtil.determineMaximumListSize(columns);

        List<YailList> tuples = new ArrayList<YailList>();

        // Generate tuples from the columns
        for (int i = 1; i < rows; ++i) {
            ArrayList<String> tupleElements = new ArrayList<String>();

            // Add entries to the tuple from all i-th values (i-th row)
            // of the data columns.
            for (int j = 0; j < columns.size(); ++j) {
                Object value = columns.getObject(j);

                // Invalid column specified; Add default value (minus one to
                // compensate for the skipped value)
                if (!(value instanceof YailList)) {
                    tupleElements.add(getDefaultValue(i - 1));
                    continue;
                }

                // Safe-cast value to YailList
                YailList column = (YailList) value;

                if (column.size() > i) { // Entry exists in column
                    // Add entry from column
                    tupleElements.add(column.getString(i));
                } else if (column.size() == 0) { // Column empty (default value should be used)
                    // Use default value instead (we use an index minus one to componsate
                    // for the skipped initial value)
                    tupleElements.add(getDefaultValue(i - 1));
                } else { // Column too small
                    // Add blank entry (""), up for the addEntryFromTuple method
                    // to interpret.
                    tupleElements.add("");
                }
            }

            // Create the YailList tuple representation and add it to the
            // list of tuples used.
            YailList tuple = YailList.makeList(tupleElements);
            tuples.add(tuple);
        }

        // Return result as YailList
        return YailList.makeList(tuples);
    }
The importFromColumns method itself only calls the method that constructs tuples from the columns, and then imports them via the importFromList method.
The getTuplesFromColumns method does the following:
A rather important observation is that if a column is empty, all of its values will be substituted by default values. Empty columns are essentially interpreted as the default option to fill in extra values, such as to allow importing, for example, a single column into the Data Series.
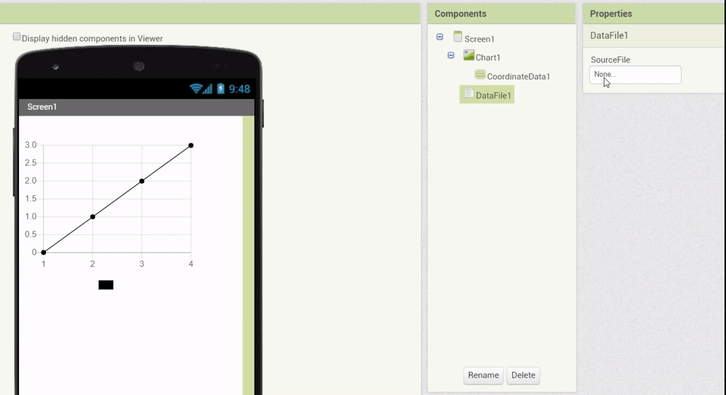
To provide a relatively simple and quick to use interface in the Designer itself, the DataFile has been adapted to also parse a limited subset of data (10 entries, plus the column names). With this implementation in order, property setters were made specifically for the DataFile. Whenever a DataFile Source is attached, the columns can be chosen via dropdown menus, and the data of the Data Series is updated to represent the chosen columns.
The following animation demonstrates this feature:
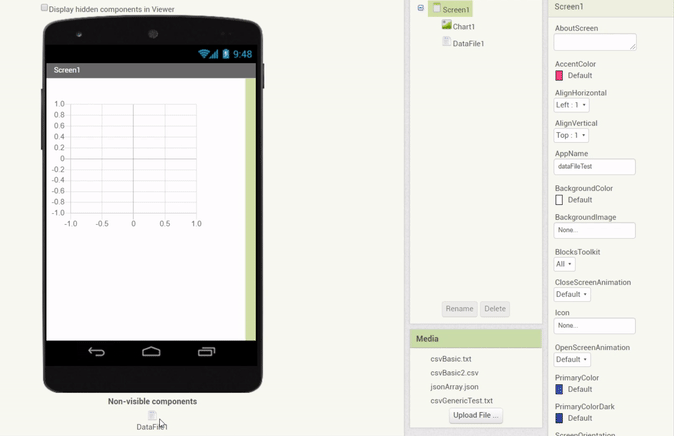
In addition, a feature was implemented which allows to drag & drop a DataFile component (with a valid file selected) onto a Chart directly, which automatically creates Data components with the corresponding properties (Source attached and columns set):
Another component that is a viable Chart Data Source is the pre-existing Web component. In essence, the Web component could be made to behave similarly to the DataFile component. Since content of various types is received over web requests, we can apply a very similar handling to the Web component as we do to the DataFile component.
The core part of the Web component data parsing is that the type of the file is known. Therefore, based on the MIME type alone, the type of the Data can be determined. For instance, if the response type is the text/csv MIME type, we can apply CSV parsing. If we have the application/json type, we can apply JSON parsing. After determining the type, the parsing process is roughly the same as the DataFile parsing process (apart from reading the file, since we get the raw response content directly)
The data importing process from the Web component is as follows:
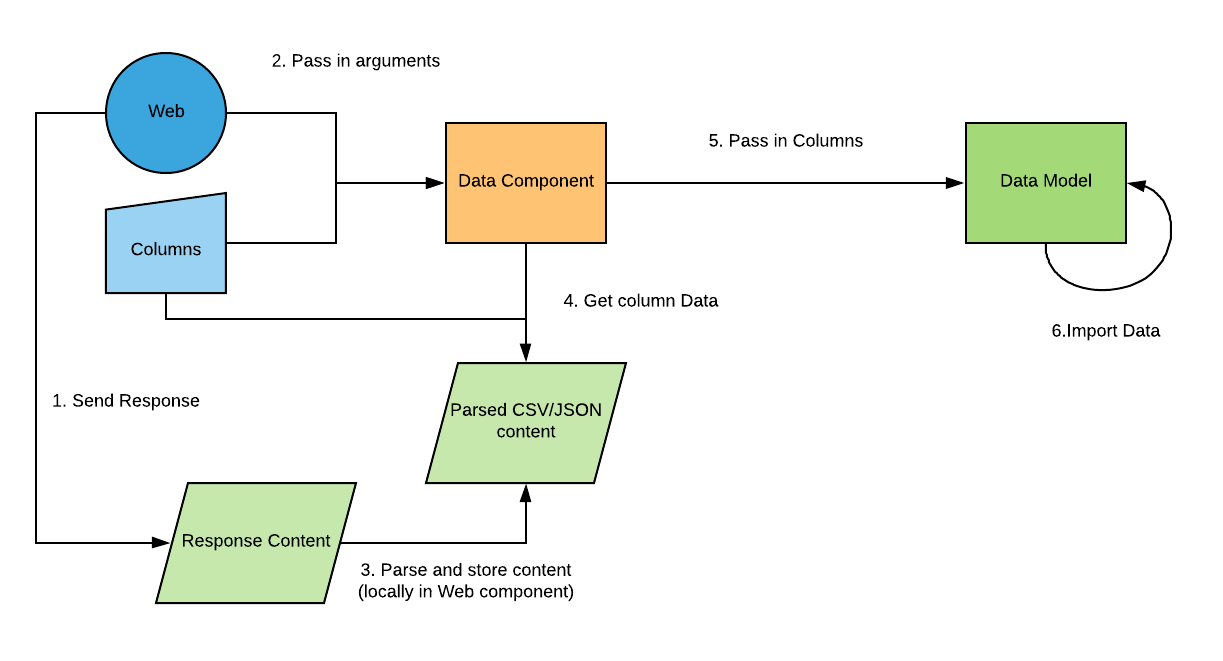
The first step of the Data importing process starts from actually sending the GET request with the Web component. The idea behind the importing of the Web component is that the response content is saved locally in the Web component, which can then be retrieved by Chart Data components. Doing so ensures that a request can be sent once, and then the latest data can be reused as many times as needed by Data observers from the Web component. Not only does this increase performance (at the cost of memory usage), but this also limits the number of requests required to send (which is quite an important factor, especially for APIs which allow limited requests).
The local data updating starts from a pre-existing method which performs the requests itself:
  private void performRequest(final CapturedProperties webProps, byte[] postData, String postFile, String httpVerb)
      throws IOException {

    // ... (code which handles opening HTTP connections and POSTing data)

    // Get the response.
    final int responseCode = connection.getResponseCode();
    final String responseType = getResponseType(connection);

    // ...

    if (saveResponse) {
        // ... (Response is saved; This case is unhandled)
    } else {
        final String responseContent = getResponseContent(connection);

        // Update the locally stored columns list with the contents of the
        // retrieved response & response type.
        updateColumns(responseContent, responseType);

        // Notify all data observers with null key and null value.
        notifyDataObservers(null, null);

        // ... (Dispatch AI event)
    }
  }
The additions as part of the Web data importing change is in the else part of the if-else block. As soon as the content of a response is retrieved, the local data columns are updated, and all the Data Observers are notified. Note the null variable convention in use here – the null key indicates that all the observers should be notified, and the null value is used because the columns are already stored locally, therefore no value has to be passed in. We will see later on why this choice was made, but the main reason for this is to avoid interpreting the data on the Web component itself, and leave the task up for the Data components.
The updateColumns method looks as follows:
  /**
   * Updates the local Columns List based on the specified response content
   * and type. Columns are parsed either from JSON or CSV, depending on
   * the response type. On invalid response types, parsing is simply skipped.
   *
   * Currently supported MIME types are all types which have 'json' in the name,
   * types which have 'csv' in the name, as well as types which start with 'text/'
   *
   * @param responseContent  Content of the response
   * @param responseType  Type of the response
   */
  private void updateColumns(final String responseContent, final String responseType) {
    // Check whether the response type is a JSON type (by checking
    // whether the response type contains the String 'json')
    // If this is not the case, CSV parsing is attempted if the
    // response type contains the 'csv' String or the type starts
    // with 'text/'.
    if (responseType.contains("json")) {
      // Proceed with JSON parsing
      try {
        columns = JsonUtil.getColumnsFromJSON(responseContent);
      } catch (JSONException e) {
        // Json importing unsuccessful
      }
    } else if (responseType.contains("csv") || responseType.startsWith("text/")) {
      try {
        columns = CsvUtil.fromCsvTable(responseContent);
        columns = ChartDataSourceUtil.getTranspose(columns);
      } catch (Exception e) {
        // Set columns to empty List (failed parsing)
        columns = new YailList();
      }
    }
  }
Note how one of the arguments is the type of the retrieved response. If the responseType String contains the word JSON, the data is assumed to be JSON formatted. Otherwise, if the responseType contains the term “csv” or the type starts with the prefix “text/”, CSV parsing is attempted. The reason for this is because types like “text/plain” could still be CSV formatted.
Another point to note is that in the case of CSV, the columns are parsed, and then the transpose is taken. The reason for this is because CSV parsing returns the rows, but only the columns are stored locally.
After the Data has been successfully retrieved from the response, the next step is to actually make the data retrievable by other components.
Recall that the type of the returned Data Value is a Future object wrapping a YailList object. The getDataValue method (which is the method from the ChartDataSource interface).
Before we get into the details, one important thing to note is that in the Web component, all request sending operations are ran asynchronously, but not in order (so Runnables are simply executed as new Threads). However, this might pose a problem when fetching the Data itself, since we actually need the requests to be finished before we retrieve the Data.
To implement this, a decision was made to keep track of the last running Runnable as a FutureTask object. Instead of executing Threads without tracking anything, FutureTasks are executed asynchronously, and stored locally. When Data is retrieved, the idea is to then wait for the last known task to end before returning the data.
The code for this then looks as follows:
  @Override
  public Future<YailList> getDataValue(final YailList key) {
    // Record the last running asynchronous task. The FutureTask's
    // calculations will wait for the completion of the task.
    final FutureTask<Void> currentTask = lastTask;

    // Construct a new FutureTask which handles returning the appropriate data
    // value after the currently recorded last task is processed.
    FutureTask<YailList> getDataValueTask = new FutureTask<YailList>
        (new Callable<YailList>() {
      @Override
      public YailList call() throws Exception {
        // If the last recorded GET task is not yet done/cancelled, then the get()
        // method is invoked to wait for completion of the task.
        if (currentTask != null && !currentTask.isDone() && !currentTask.isCancelled()) {
          try {
            currentTask.get();
          } catch (InterruptedException e) {
            e.printStackTrace();
          } catch (ExecutionException e) {
            e.printStackTrace();
          }
        }

        // Return resulting columns
        return getColumns(key);
      }
    });

    // Run and return the getDataValue FutureTask
    AsynchUtil.runAsynchronously(getDataValueTask);
    return getDataValueTask;
  }
In the getDataValueTask, first the get method is called on the last known task to wait for the task to end, and then the getColumns method is invoked with the key value (which represents the columns to retrieve) to return the result. Since the FutureTask uses a Callable, the corresponding columns can later be retrieved from the FutureTask.
With regards to the getColumns method, the method functions very similarly to the DataFile getDataValue method.
As we have defined the methods and concepts in retrieving the Data, the last step is to retrieve and import it to the Chart Data components.
The method which imports Data from the Web component looks as follows:
    protected void importFromWebAsync(final Web webComponent, final YailList columns) {
      // Get the Future object representing the columns in the Web component.
      final Future<YailList> webColumns = webComponent.getDataValue(columns);

        // Import the Data from the Web component asynchronously
        threadRunner.execute(new Runnable() {
            @Override
            public void run() {
              // Get the data columns from the Web component. The retrieval of
              // the result is blocking, so it will first wait for
              // the retrieval to be processed in full.
              YailList dataColumns = null;

              try {
                dataColumns = webColumns.get();
              } catch (InterruptedException e) {
                e.printStackTrace();
              } catch (ExecutionException e) {
                e.printStackTrace();
              }

                // Import the data from the retrieved columns
                chartDataModel.importFromColumns(dataColumns);

                // Refresh the Chart after import
                refreshChart();
            }
        });
    }
In essence, the method does exactly the same – the Future object holding the columns is retrieved, and then the Future object’s Data value is retrieved asynchronously, and then the columns are imported.
In the future, this might be generalized to both the DataFile and Web component, so that two highly similar methods would not be used.
With this method being called as the last step, the data is finally imported into the Data Series.
In addition to static Data retrieval, the Web component can very much act like an observable Data Source. After responses are retrieved, the Data Observers can then be notified of the changes (we have seen the notifyDataObservers method call in the processRequest method)
The first step to add Observable Chart Data Source support is adding an if-else statement for the Web component (much like it was done for the TinyDB and CloudDB components). The same is also done for the DataFile component to add support for an attachable DataFile source (although a decision was made to not make the DataFile component and observable source).
The final resulting if-else blocks in the Source property look as follows:
    if (dataSource instanceof DataFile) {
        importFromDataFileAsync((DataFile)dataSource, YailList.makeList(dataFileColumns));
    } else if (dataSource instanceof TinyDB) {
        ImportFromTinyDB((TinyDB)dataSource, dataSourceValue);
    } else if (dataSource instanceof CloudDB) {
        ImportFromCloudDB((CloudDB)dataSource, dataSourceValue);
    } else if (dataSource instanceof Web) {
        importFromWebAsync((Web)dataSource, YailList.makeList(webColumns));
    }
While this is not ideal, and changes can be made to reduce some redundancy, it is still quite clear that some form of case-by-case handling is necessary, since Web and DataFile components, for instance, take a List of columns as the key input, while the TinyDB and CloudDB components take a single Tag as the key value.
Finally, in the method which handles the event to listen for Data Source value changes, the following if block is added for the Web component:
    // Update currentDataSourceValue; Web component requires different handling
    // from all other ObservableChartDataSource components.
    if (component instanceof Web) {
        // Get the columns from the local webColumns properties
        YailList columns = ((Web)component).getColumns(YailList.makeList(webColumns));

        // Set the current Data Source Value to all the tuples from the columns.
        // This is needed to easily remove values later on when the value changes
        // again.
        currentDataSourceValue = chartDataModel.getTuplesFromColumns(columns);
    }
We have previously seen the getTuplesFromColumns method when importing Data from columns. Since the Web component holds all the columns, a decision was made to instead handle the data selection in the Chart Data components itself, to leave the Web component’s data more neutral, and up for interpretation for other sources.
The reason why we need to get the specific columns is to be able to import the Data selectively, as well as remove the older data on value changes.
Another point to recall is that the Web component invoked the notifyDataObservers method with a null key and value; The reason why this is done should now be clear – the Chart Data components interpret the data themselves by fetching the required columns, therefore neither the key, nor the value are important when receiving this event.
With these implementations, the Web component was converted to an Observable Chart Data Source.
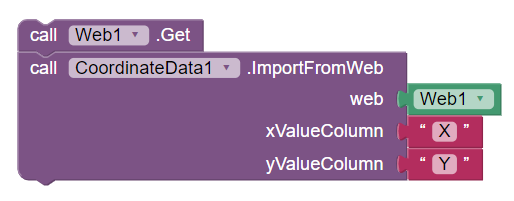
With regards to importing itself, as with all the other Data Source components, it can be done in 3 ways – via changing the Source, via changing the Designer properties and via blocks.
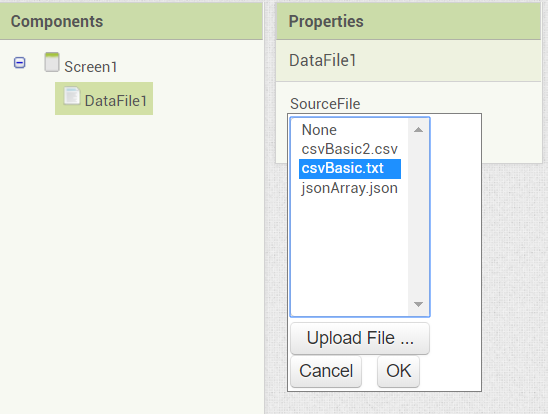
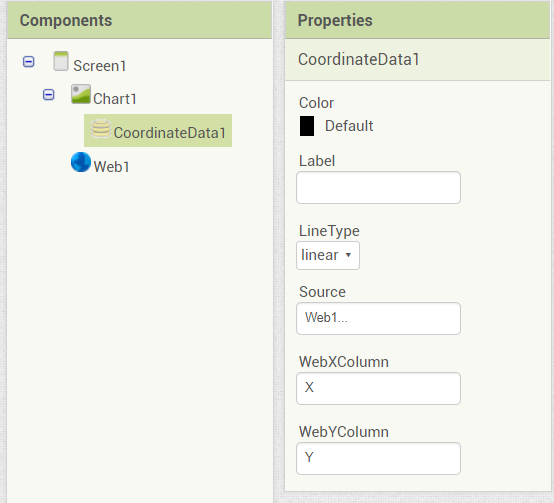
Via Designer properties, the setup would look as follows:
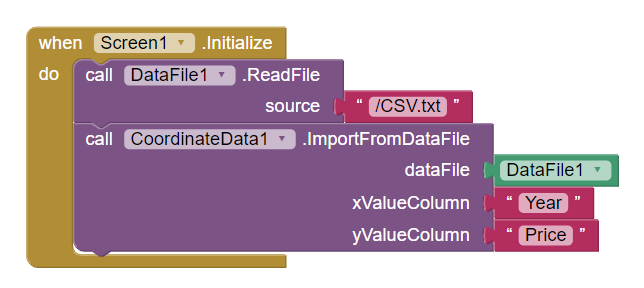
The equivalent importing in blocks would look as follows:
For the curious readers, the main pull requests related the CSV, JSON and Web import features can be found here:
This has been quite another lengthy post describing more Data Source importing options and concepts. A final post on Data Source importing will revolve around Real Time Data Sources, and this post concludes the static & observable non-real time Chart Data Source importing options.
As the project is nearing to an end, the next post will follow very soon.
Stay tuned!
Overview In the last post, I have thoroughly covered the implemented Pie Chart type for the App Inventor Chart components project that I have been working on...
Overview Last post, I have wrapped up the implemented methods for importing data to the Charts for the App Inventor Charts project that I have been working o...
Overview In the previous post on the App Inventor Chart Components project, I have covered data importing from Files, as well as from the Web. Previously, we...
Overview In the previous post on the App Inventor Chart Components project, we have looked at an extensive description of Chart Data Source concepts and real...
Overview It has been a while since the last post due to a highly busy period! A lot of blog posts were postponed, but now a series of posts will follow in th...
Overview Following up on the App Inventor Chart components project, this blog post will focus on a specific workflow aspect that allows to select the Chart t...
Overview With the workflow for the App Inventor Chart components established, the next step is to define the concepts and format of the Data that can be impo...
Problem While working with Charts in Android using the MPAndroidChart library, one inconsistency that I stumbled upon is the fact that all the Charts support...
Overview In the last post, I have previewed the workflow of the Charts components that I am working on for App Inventor. In this post, I will dive into some ...
Overview Following up on the Chart prototypes, this post will focus on previewing the current progress on the Charts components in App Inventor.
Overview In continuation to the previous previous blog post, this post will focus on a Line Chart Component prototype in App Inventor.
Overview During the initial steps of the project to develop Chart Components for App Inventor, the major focus was on the design of the components such that ...
As the community bonding period is nearing to an end and the coding period is about to begin, I would like give a status update on what happened in the last ...
Introduction I am Evaldas Latoškinas, currently a first year Computer Science & Engineering international student in the Netherlands at TU Delft. Origina...