App Inventor Chart Components: Project Summary
It has been a while since the last post due to a highly busy period! A lot of blog posts were postponed, but now a series of posts will follow in these two weeks documenting most of the features that I have worked on the App Inventor Chart components project!
One of the core features of Chart Data Importing will be discussed in this blog post as a direct follow up to the post documenting Data Import from Tuples. This post will primarily focus on the introduced Data Source concepts for the Chart components, as well as TinyDB & CloudDB importing.
In order to somewhat generalize all the possible Chart Data Sources (as well as future additions), a design choice was made to introduce the concept of a Data Source, which means that all possible Chart Data Sources would implement from some interfaces and data retrieval would be very similar amongst all Data Sources. Alongside that, the usage of Chart Data Sources for the Data component would be more or less highly similar.
The following diagram illustrates the idea:

Note the Data Key Values argument used. This argument essentially allows to be selective about the data coming from the component, allowing to import different sets of Data. For instance, in a Database, the key value would be a single Tag value which identifies entries. However, there are also Data Sources which would require multiple tags, for example CSV Files, which would require specifying multiple column names.
The defined Data Source concept essentially allows to make data importing quite consistent, and makes it easier to implement new compatible Data Sources in the future.
To make this concept work, the implementation essentially has to be based on interfaces. Each compatible Data Source should implement the required corresponding Data Source interface to be identified as such.
While analyzing every currently possible Data Source, I have decided to group them into 3 categories:
While thinking of these 3 categories, I have also made an observation that they actually share some characteristics. For one, all Data Sources can return values by manual retrieval, so in fact, the Observable and Real Time Data Sources are extensions of the Static Data Source.
Another observation is between the Observable and Real Time Data Sources. In fact, they both exhibit the same behavior, except that the Observable Data Source updates the values, and the Real Time Data Source sends new values. However, from the point of view of the Data Source interface, these details will not matter, since the Data component will be the one processing the data. Hence, this leads to the following hierarchy design:
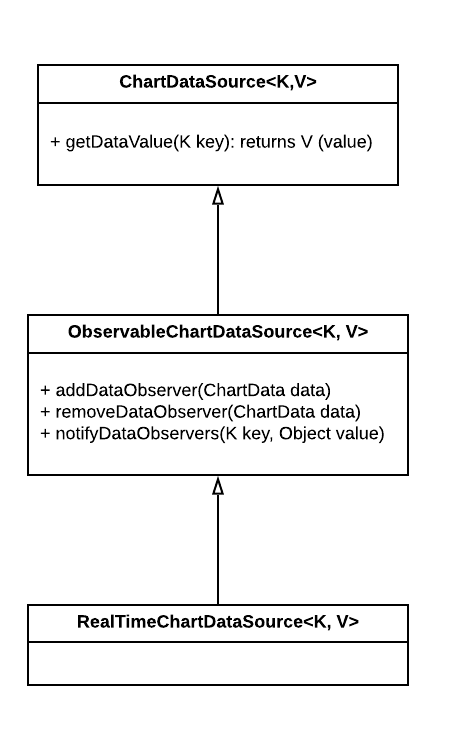
In terms of workflow, there are multiple ways to import Data from the Data Sources:



Let’s now look at some parts of the implementation. The first part that we will look at is realizing the proposed Data Source hierarchy in code.
/**
 * Interface for acceptable Chart Data Source components.
 * Contains the necessary methods for the Chart Data component
 * to interact with the Data Source in importing data.
 *
 * @param <K>  key (data identifier)
 * @param <V>  value (returned data type)
 */
@SimpleObject
public interface ChartDataSource<K, V> {
  /**
   * Gets the specified data value
   *
   * @param key  identifier of the value
   * @return  value identified by the key
   */
  public V getDataValue(K key);
}
/**
* Interface for observable Chart Data Source components.
* Contains the necessary methods to link, unlink and
* notify observers
*
* @param <K> key (data identifier)
* @param <V> value (returned data type)
*/
public interface ObservableChartDataSource<K,V>
extends ChartDataSource<K,V> {
/**
* Adds a new Chart Data observer to the Data Source
* @param dataComponent Chart Data object to add as an observer
*/
public void addDataObserver(ChartDataBase dataComponent);
/**
* Removes the specified Chart Data observer from the observers list,
* if it exists.
* @param dataComponent Chart Data object to remove
*/
public void removeDataObserver(ChartDataBase dataComponent);
/**
* Notifies the observers of a value change
* @param key key of the value that changed
* @param newValue new value
*/
public void notifyDataObservers(K key, Object newValue);
}/**
* Interface for observable real-time data
* producing Chart Data Source components.
*
* @param <K> key (data identifier)
* @param <V> value (returned data type)
*/
public interface RealTimeChartDataSource<K, V>
extends ObservableChartDataSource<K, V> {
}As one might notice, the implementation exactly corresponds to the UML model. The interfaces were kept relatively simple, containing only the necessary methods. Most of the heavy lifting will, in fact, be handled by the Data components themselves, as it is up to them to interpret the Data coming from Data Sources.
One important part to note is the notifyDataObservers method. Since we want to generalize this as much as possible, the ChartData component is complemented with an interface to retrieve the notification events:
/**
 * Interface for observing Data Source value changes.
 */
public interface ChartDataSourceChangeListener {
  /**
   * Event called when the value of the observed ChartDataSource component changes.
   *
   * @param component  component that triggered the event
   * @param key  key of the value that changed
   * @param newValue  the new value of the observed value
   */
  public void onDataSourceValueChange(ChartDataSource component, String key, Object newValue);
}
In the implementation of the notifyDataObservers, the onDataSourceValueChange method needs to be called for each Observer (as we will see later). For the implementation of the Real Time Chart Data Source, a different interface will be introduced (to be shown in a subsequent blog post)
Due to the way that property setters and Object types are parsed right now in App Inventor, unfortunately some form of hardcoding is still required. Since the Source property should only accept eligible Chart Data Sources, we need to define a new Property (which we name PROOPERTY_TYPE_CHART_DATA_SOURCE) with its own Property Editor (this is something in App Inventor that manages the workflow of selecting properties via the properties window in the Designer).
The code for initializing the Property Editor looks as follows:
    // Construct a HashSet of acceptable Chart Data Source components
    private static final HashSet<String> CHART_DATA_SOURCES = new HashSet<String>() ;

    // ...
    } else if (editorType.equals(PropertyTypeConstants.PROPERTY_TYPE_CHART_DATA_SOURCE)) {
      return new YoungAndroidComponentSelectorPropertyEditor(editor, CHART_DATA_SOURCES);
    }
    // ...
The details of the Property Editor are not as important, the important fact is that the constructor’s second argument accepts a HashSet of eligible components. Since abstract types and interfaces are not recognized by the parsing done on compilation, we must specify each component individually in the constant HashSet.
Let us now move on to a concrete example implementation of a Data Source - the TinyDB component. This is an existing component that allows storing key-value pairs locally, and hence can be adapted to work as a Data Source for the Charts.
The data importing process is as follows:

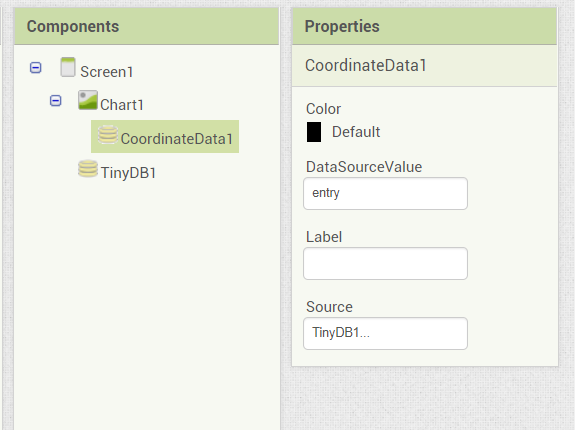
The first step begins from specifying the data import to happen from the TinyDB component. This can be done in any of the 3 ways mentioned before (directly via blocks, via properties or via changing Data Source via a block). The chosen format for values for the TinyDB were that a single value (identified by a tag) corresponds to an entire data series, meaning that a single value is a List of Lists, where each List entry corresponds to an entry of the data series, represented as a tuple. The format is as follows:
( (x1 y1) (x2 y2) ... (xn yn) )A list is represented using the round brackets. An example of a Data Series in this format is as follows:
( (1 3) (2 4) (3 1) )In blocks, this looks as follows:
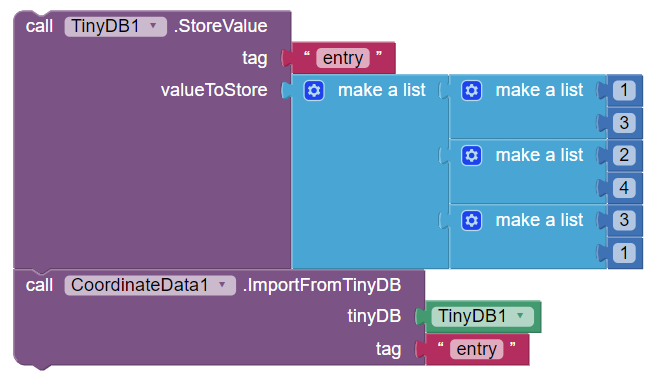
Note how in the TinyDB component, a single tag holds the entire List of Lists, which corresponds to the format described.
The next step is for the Data component to retrieve the value from the TinyDB component and pass it on to the Data model. In the code, this looks as follows:
    /**
     * Imports data from the specified TinyDB component with the provided tag identifier.
     *
     * @param tinyDB  TinyDB component to import from
     * @param tag  the identifier of the value to import
     */
    @SimpleFunction(description = "Imports data from the specified TinyDB component, given the tag of the " +
        "value to use. The value is expected to be a YailList consisting of entries compatible with the " +
        "Data component.")
    public void ImportFromTinyDB(final TinyDB tinyDB, final String tag) {
        final List list = tinyDB.getDataValue(tag); // Get the List value from the TinyDB data

        // Update the current Data Source value (if appropriate)
        updateCurrentDataSourceValue(tinyDB, tag, list);

        // Import the specified data asynchronously
        threadRunner.execute(new Runnable() {
            @Override
            public void run() {
                chartDataModel.importFromList(list);
                refreshChart();
            }
        });
    }
This is a snippet corresponding to the implemented ImportFromTinyDB block. The following steps occur:
public class TinyDB extends AndroidNonvisibleComponent implements Component, Deleteable,
    ObservableChartDataSource<String, List> {

  // ...

  /**
   * Returns the specified List object identified by the key. If the
   * value is not a List object, or it does not exist, an empty List
   * is returned.
   *
   * @param key  Key of the value to retrieve
   * @return  value as a List object, or empty List if not applicable
   */
  @Override
  public List getDataValue(String key) {
    // Get the value from the TinyDB data with the specified key
    Object value = GetValue(key, new ArrayList());

    // Check if value is of type List, and return it if that is the case.
    if (value instanceof List) {
      return (List)value;
    }

    // Default option (could not parse data): return empty ArrayList
    return new ArrayList();
  }

  // ...
}
The implementation on TinyDB’s end is quite simple; The value is simply retrieved using the existing GetValue method, the value is checked if it is a List (and returned if that is the case), and then the value is returned. If the value is not a List, an empty List is simply returned (indicating that no data should be imported)
We have already seen in a previous blog post what happens in the importFromList method in the Chart Data Model, therefore we will not touch upon it again.
It gets a bit more complicated when we implement the TinyDB component to be observable by the Chart. There are quite a few important considerations to take into account when implementing observable Chart Data Sources. They are as follows:
First, let’s take a look at the TinyDB side of the implementation (we will take a look at the Chart Data side of the implementation in a later section), which is simpler than the Data component’s functionality with regards to Data Sources:
public class TinyDB extends AndroidNonvisibleComponent implements Component, Deleteable,
    ObservableChartDataSource<String, List> {

  // ...

  // Set of observers
  private HashSet<ChartDataBase> dataSourceObservers = new HashSet<ChartDataBase>();

  // SharedPreferences listener used to notify observers
  private SharedPreferences.OnSharedPreferenceChangeListener sharedPreferenceChangeListener;

  @SimpleProperty(description = "Namespace for storing data.", category = PropertyCategory.BEHAVIOR)
  @DesignerProperty(editorType = PropertyTypeConstants.PROPERTY_TYPE_STRING, defaultValue = DEFAULT_NAMESPACE)
  public void Namespace(String namespace) {
    // ...

    // SharedPreferences listener currently exists; Unregister it
    if (sharedPreferenceChangeListener != null) {
      sharedPreferences.unregisterOnSharedPreferenceChangeListener(sharedPreferenceChangeListener);
    }

    // Create a new SharedPreferences change listener
    sharedPreferenceChangeListener = new SharedPreferences.OnSharedPreferenceChangeListener() {
      @Override
      public void onSharedPreferenceChanged(SharedPreferences sharedPreferences, String key) {
        // Upon value change, notify the observers with the key and the value
        notifyDataObservers(key, GetValue(key, null));
      }
    };

    // Register the SharedPreferences change listener
    sharedPreferences.registerOnSharedPreferenceChangeListener(sharedPreferenceChangeListener);
  }

  // ...

  /**
   * Clear the entire data store
   *
   */
  @SimpleFunction
  public void ClearAll() {
    // ...
    notifyDataObservers(null, null); // Notify observers with null value to be interpreted as clear
  }

  @Override
  public void onDelete() {
    // ...
    notifyDataObservers(null, null); // Notify observers with null value to be interpreted as clear
  }

  @Override
  public void addDataObserver(ChartDataBase dataComponent) {
    dataSourceObservers.add(dataComponent);
  }

  @Override
  public void removeDataObserver(ChartDataBase dataComponent) {
    dataSourceObservers.remove(dataComponent);
  }

  @Override
  public void notifyDataObservers(String key, Object newValue) {
    // Notify each Chart Data observer component of the Data value change
    for (ChartDataBase dataComponent : dataSourceObservers) {
      dataComponent.onDataSourceValueChange(this, key, newValue);
    }
  }
}
First, let’s take a look at the interface’s implemented methods which add, remove and notify the Data Observers. These are kept quite simple. The remove and add methods simply modify the Data Source Observers HashSet accordingly, while the notifyDataObservers method simply notifies each Data Component with the appropriate key and newValue object which corresponds to the change event being notified of.
Now, let’s move our way up to the ClearAll and onDelete methods. Since these operations do not invoke any events whatsoever on the underlying SharedPreferences object, we must manually notify all the Data Observers. We use a convention here – the null key means that all observers need to be notified (think of it as a global key), and the null value simply indicates that the new value is non-existent (null).
Finally, the most important part of the implementation is the change in the Namespace method. We essentially want to keep track of changes to the values in the underlying data structure, which is the SharedPreferences object. We can accomplish this quite simply by making use of the OnSharedPreferencesChangeListener. Whenever a value changes, the Listener gets invoked.
Since Namespace changes are possible, we only want to keep one such Listener at a time, so we unregister the last listener whenever the Namespace changes. Then, we register a new one, which notifies all Data Observers of the change with the new value (or null, if the value is not present).
The end result is that we have constructed a fully observable TinyDB component.
Let us now look at some concrete examples in App Inventor itself.
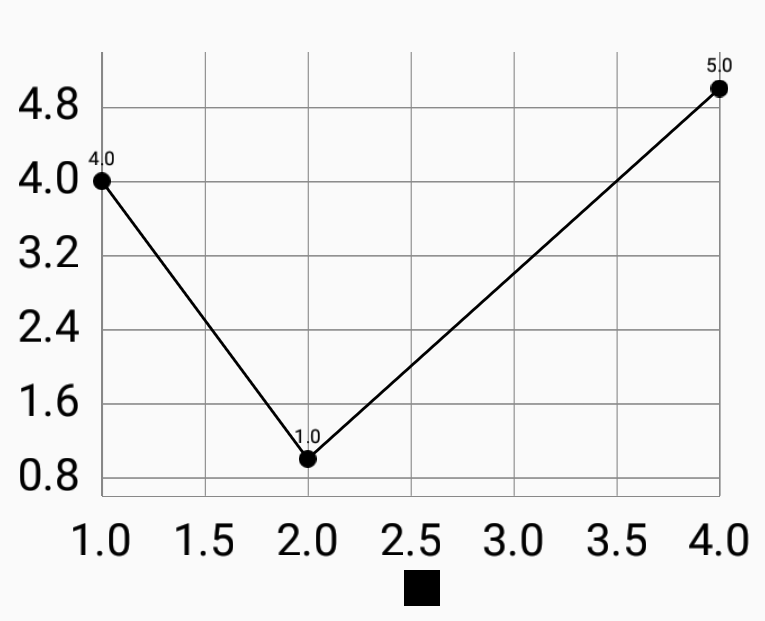
First, let’s consider a simple example where data is imported via blocks.
The Designer window simply consists of a Chart component attached with a single, default-property Data component, as well as a TinyDB component with its default properties. The blocks setup is as follows:
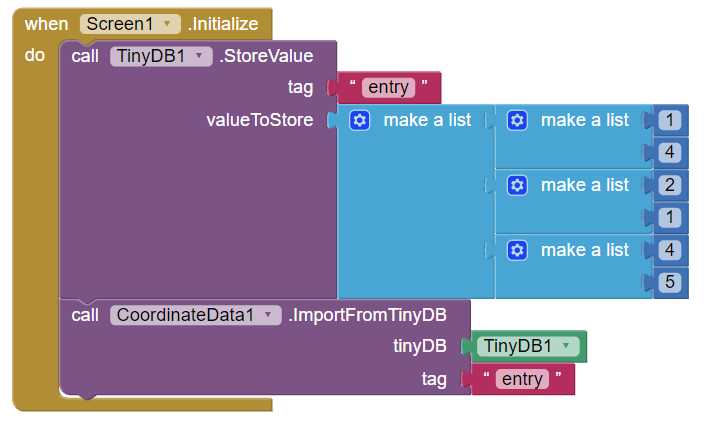
The result when starting the app is as follows:
Consider the following properties and block setup:
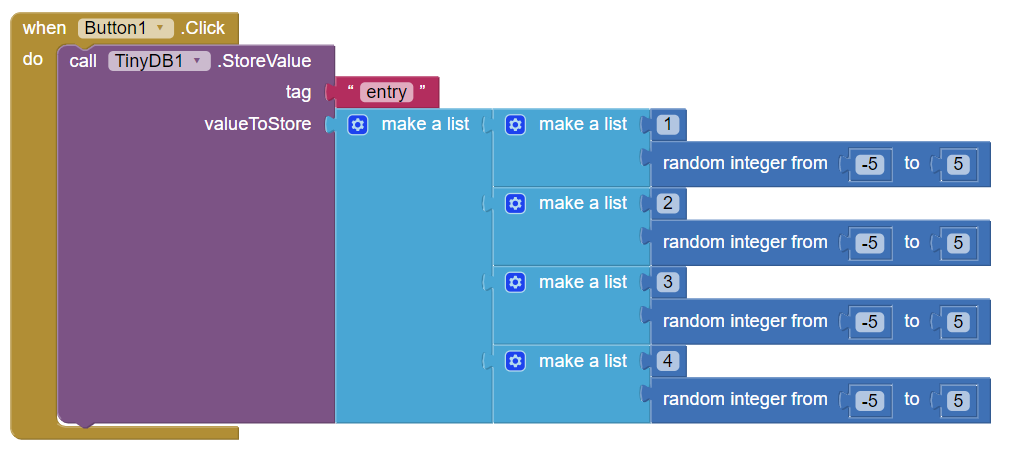
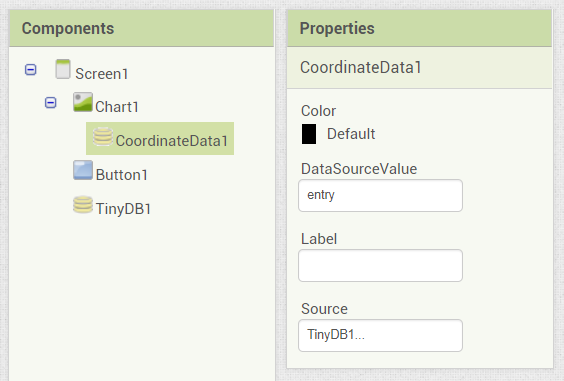
The following animation illustrates how the observed data keeps changing:

We have seen the TinyDB implementation as an Observable Chart Data Source, however, there is quite a large amount of logic in the Chart Data component itself.
Below is the entirety of the code for the ChartDataBase class which covers observable data import support for TinyDB & CloudDB (see below the code snippet for a walkthrough of the code):
public abstract class ChartDataBase implements Component, OnInitializeListener, ChartDataSourceChangeListener {
    // Property used in Designer to import from a Data Source.
    // Represents the key value of the value to use from the
    // attached Data Source.
    protected String dataSourceValue;

    private ChartDataSource dataSource; // Attached Chart Data Source

    // Currently imported observed Data Source value. This has to be
    // kept track of in order to remove old entries whenever the
    // value is updated.
    private Object currentDataSourceValue;

    private boolean initialized = false; // Keep track whether the Screen has already been initialized

    // ...

    /**
     * Sets the Data Source key identifier for the value to import from the
     * attached Data Source.
     *
     * An example is the tag of the TinyDB component, which identifies the value.
     *
     * The property is a Designer-only property, to be changed after setting the
     * Source component of the Chart Data component.
     * @param value  new (key) value
     */
    @DesignerProperty(editorType = PropertyTypeConstants.PROPERTY_TYPE_STRING, defaultValue = "")
    @SimpleProperty(description="Sets the value identifier for the data value to import from the " +
        "attached Data Source.",
        category = PropertyCategory.BEHAVIOR,
        userVisible = false)
    public void DataSourceValue(String value) {
        this.dataSourceValue = value;
    }


    /**
     * Sets the Data Source for the Chart data component. The data
     * is then automatically imported.
     *
     * @param dataSource  Data Source to use for the Chart data.
     */
    @SimpleProperty(category = PropertyCategory.BEHAVIOR,
            description = "Sets the Data Source for the Data component. Accepted types " +
                    "include TinyDB and CloudDB.")
    @DesignerProperty(editorType = PropertyTypeConstants.PROPERTY_TYPE_CHART_DATA_SOURCE)
    public void Source(ChartDataSource dataSource) {
        // If the previous Data Source is an ObservableChartDataSource,
        // this Chart Data component must be removed from the observers
        // List of the Data Source.
        if (this.dataSource instanceof ObservableChartDataSource) {
            ((ObservableChartDataSource)this.dataSource).removeDataObserver(this);
        }

        this.dataSource = dataSource;

        // The data should only be imported after the Data component
        // is initialized, otherwise exceptions may be caused in case
        // of very small data files.
        if (initialized) {
          if (dataSource instanceof ObservableChartDataSource) {
            // Add this Data Component as an observer to the ObservableChartDataSource object
            ((ObservableChartDataSource)dataSource).addDataObserver(this);
          }

            if (dataSource instanceof TinyDB) {
                ImportFromTinyDB((TinyDB)dataSource, dataSourceValue);
            } else if (dataSource instanceof CloudDB) {
                ImportFromCloudDB((CloudDB)dataSource, dataSourceValue);
            }
        }
    }

    /**
     * Links the Data Source component with the Data component, if
     * the Source component has been defined earlier.
     *
     * The reason this is done is because otherwise exceptions
     * are thrown if the Data is being imported before the component
     * is fully initialized.
     */
    @Override
    public void onInitialize() {
        initialized = true;

        // Data Source should only be imported after the Screen
        // has been initialized, otherwise some exceptions may occur
        // on small data sets with regards to Chart refreshing.
        if (dataSource != null) {
            Source(dataSource);
        } else {
            // If no Source is specified, the ElementsFromPairs
            // property can be set instead. Otherwise, this is not
            // set to prevent data overriding.
            ElementsFromPairs(elements);
        }
    }

    /**
     * Event called when the value of the observed ChartDataSource component changes.
     *
     * If the key matches the dataSourceValue of the Data Component, the specified
     * new value is processed and imported, while the old data part of the Data
     * Source is removed.
     *
     * A key value of null is interpreted as a change of all the values, so it would
     * change the imported data.
     *
     * @param component  component that triggered the event
     * @param key  key of the value that changed
     * @param newValue  the new value of the observed value
     */
    @Override
    public void onDataSourceValueChange(final ChartDataSource component, String key, final Object newValue) {
        if (component != dataSource // Calling component is not the attached Data Source.
            || (key != null && !key.equals(dataSourceValue))) { // The changed value is not the observed value
            return;
        }

        // Run data operations asynchronously
        threadRunner.execute(new Runnable() {
            @Override
            public void run() {
                // Old value originating from the Data Source exists and is of type List
                if (currentDataSourceValue instanceof List) {
                    // Remove the old values
                    chartDataModel.removeValues((List)currentDataSourceValue);
                }

                // Update current Data Source value
                currentDataSourceValue = newValue;

                // New value is a List; Import the value
                if (currentDataSourceValue instanceof List) {
                    chartDataModel.importFromList((List)currentDataSourceValue);
                }

                // Refresh the Chart view
                refreshChart();
            }
        });
    }

    /**
     * Updates the current observed Data Source value if the source and key matches
     * the attached Data Source & value
     * @param source  Source component
     * @param key  Key of the updated value
     * @param newValue  The updated value
     */
    private void updateCurrentDataSourceValue(ObservableChartDataSource source, Object key, Object newValue) {
        if (source == dataSource // The source must be the same as the attached source
            && key != null // The key must be non-null
            && key.equals(dataSourceValue)) { // The key should equal the local key
            currentDataSourceValue = newValue;
        }
    }
}
Starting from the top of the snippet, we can see that the DataSourceValue setter is a very straightforward operation. It is a Designer-only property, and the value is simply updated, to be used later when importing from the specified Source component.
The Source setter works as follows:
The initialized variable checks and the onInitialize method take care of the consideration for the ordering of components to ensure that all properties are fully initialized and data can be imported with no errors. Another point to note is that the ElementsFromPairs setter is completely ignored if a Data Source is present, and this is used to prevent data overriding. The ElementsFromPairs on it’s own can be taught as a Data Source, but one that comes from the user as a Designer property itself. In a later post, we will see that we actually hide this property when a Data Source is attached.
Now, let’s look at the bulk of the code, which is the onDataSourceValueChange event listener. This is invoked on notifyDataObservers from the Observable Data components itself (we have seen this in the TinyDB), and the process is as follows:
Note how we handle one of the most important considerations here – we update the values by removing the previous values contained in the Data Series. For this reason, we keep track of what is termed as the current Data Source value, which we can then use for removal. The OnDataSourceValueChange method in itself can use improvements (perhaps forcing List values, or generalizing this to support more values), but it serves for the purpose of the currently supported Observable Chart Data Sources.
Lastly, we have the updateCururentDataSourceValue method which we have seen before in the TinyDB implementation. This essentially updates the Data Source value on manual importing to ensure that the references are not broken and up to date. This was especially an issue when manual data importing would happen before the Source is properly imported (due to the initialize flag), therefore some measure was needed there. The method does all the necessary checks to ensure that the component is indeed the observed one, and that the key value matches. Global key values are ignored (this might be changed in the future)
A component of similar nature is the CloudDB component, which is also an existing component in App Inventor which stores key-value pairs as well, however, it connects to a Redis database rather than storing data locally, therefore it is a bit more tricky to implement. However, most of the ideas remain the same as for the TinyDB component.
Since the majority of the process is roughly the same for the CloudDB component, we will mostly look at things that are different compared to the TinyDB component.
Looking at the blocks, the public interface is, in fact, exactly the same:
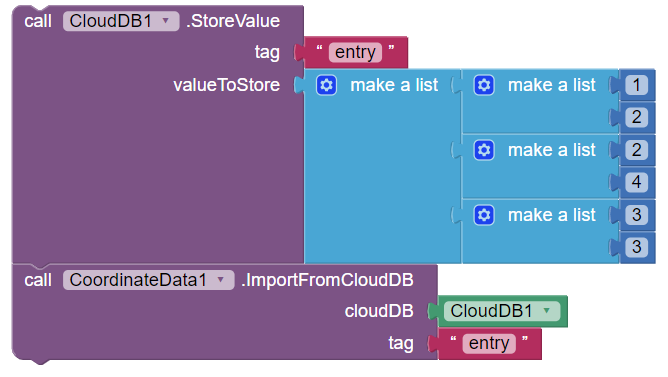
The real differences become apparent in the implementation, and especially in the observation of the CloudDB component.
Let’s first take a look at the CloudDB side of the implementation:
public final class CloudDB extends AndroidNonvisibleComponent implements Component,
  // Set of observers
  private HashSet<ChartDataBase> dataSourceObservers = new HashSet<ChartDataBase>();

  /**
   * Gets the specified value from the underlying Redis database, or
   * returns the specified value if the tag is not present.
   *
   * The value is returned as an AtomicReference, and will contain
   * a null value in case of exceptions.
   *
   * @param tag  tag of the value to get
   * @param valueIfTagNotThere  value to set to the reference if tag is not present
   * @return  AtomicReference containing the indicated value
   */
  private AtomicReference<Object> getValueByTag(final String tag, final Object valueIfTagNotThere) {
	  // ... (Previous logic of GetValueByTag() moved here for re-usability)
  }

  /**
   * Asks CloudDB to forget (delete or set to "null") a given tag.
   *
   * @param tag The tag to remove
   */
  @SimpleFunction(description = "Remove the tag from CloudDB")
  public void ClearTag(final String tag) {
    // ...

    background.submit(new Runnable() {
        public void run() {
          try {
            // ...

            // Notify all the Data Source observers of the change
            notifyDataObservers(tag, null);
          } catch (Exception e) {
            // ...
          }
        }
      });
  }

  /**
   * Indicates that the data in the CloudDB project has changed.
   * Launches an event with the tag and value that have been updated.
   *
   * @param tag the tag that has changed.
   * @param value the new value of the tag.
   */
  @SimpleEvent
  public void DataChanged(final String tag, final Object value) {
    // ... (tagValue initialized and updated)

    final Object finalTagValue = tagValue;

    // Notify all the Data Source observers of the change
    notifyDataObservers(tag, finalTagValue);

	  // ...
  }

  /**
   * Returns the specified List object identified by the key as a Future object.
   * If the value is not a List object, or it does not exist, an empty List
   * is returned.
   *
   * The return type being a Future object ensures that the data is
   * retrieved from the database asynchronously.
   *
   * @param key  Key of the value to retrieve
   * @return  Future object holding the value as a List object, or empty List if not applicable
   */
  @Override
  public Future<List> getDataValue(final String key) {
    return background.submit(new Callable<List>() {
      @Override
      public List call() {
        // Get the value identified by the tag (key) or an empty
        // YailList if not present
        AtomicReference<Object> valueReference = getValueByTag(key, new YailList());

        // Get the value as a String
        String valueString = (String) valueReference.get();

        // Parse the value from JSON
        Object value = JsonUtil.getObjectFromJson(valueString);

        // Value is a List object; Convert and return it
        if (value instanceof List) {
          return (List)value;
        }

        // Return empty list otherwise
        return new ArrayList();
      }
    });
  }
}
The first thing to note is the introduced getValueByTag method, which is essentially the logic of the previous GetValueByTag, but moved to its own method to return a value. This is required to be able to effectively reduce code redundancy with regards to retrieving the values (since this functionality is required in the getDataValue method)
One of the most important changes done is in the DataChanged event method. Since the event gets invoked whenever Data changes in the project, we can use the event to notify observers of data changes. The only modification done in this method is the addition of the notifyDataObservers line, and this allows us to make the CloudDB observable.
Afterwards, let’s look at the clearTag method. Since the DataChanged event is not invoked upon clearing a Tag, the notification of the Data Observers with an empty value has to be done manually.
Finally, we have the getDataValue method, which, in fact, returns a Future
The logic in the Callable itself is quite similar to TinyDB – the value is retrieved by Tag, and the value is then imported. There is an intermediate step for parsing the value from JSON, since CloudDB stores its data in JSON.
With this implementation, we have effectively made the CloudDB component fully observable by the Chart Data components.
Since the majority of code for handling the observation of the CloudDB component is the same as the TinyDB implementation, we will instead focus on a single method which imports data from CloudDB:
    /**
     * Imports data from the specified CloudDB component with the provided tag identifier.
     *
     * @param cloudDB  CloudDB component to import from
     * @param tag  the identifier of the value to import
     */
    @SimpleFunction(description = "Imports data from the specified CloudDB component, given the tag of the " +
        "value to use. The value is expected to be a YailList consisting of entries compatible with the " +
        "Data component.")
    public void ImportFromCloudDB(final CloudDB cloudDB, final String tag) {
        // Get the Future YailList object from the CloudDB data
        final Future<List> list = cloudDB.getDataValue(tag);

        // Import data asynchronously
        threadRunner.execute(new Runnable() {
            @Override
            public void run() {
                final List listValue;

                try {
                    // Get the value from the Future object
                    listValue = list.get();

                    // Update the current Data Source value (if appropriate)
                    updateCurrentDataSourceValue(cloudDB, tag, listValue);

                    // Import the data and refresh the Chart
                    chartDataModel.importFromList(listValue);
                    refreshChart();
                } catch (InterruptedException e) {
                    e.printStackTrace();
                } catch (ExecutionException e) {
                    e.printStackTrace();
                }
            }
        });
    }
What happens here, step by step, is as follows:
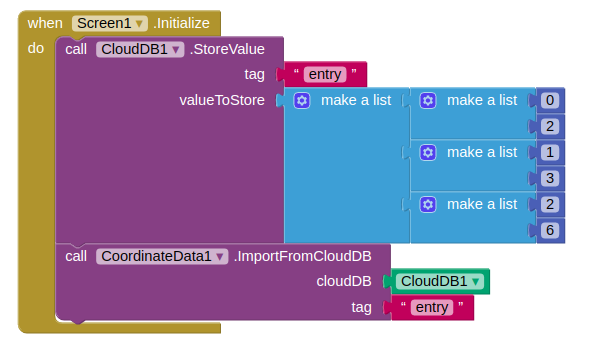
Let us now look at some concrete examples in App Inventor itself. We will analyze the same use cases as with the TinyDB component.
Consider the following block setup:
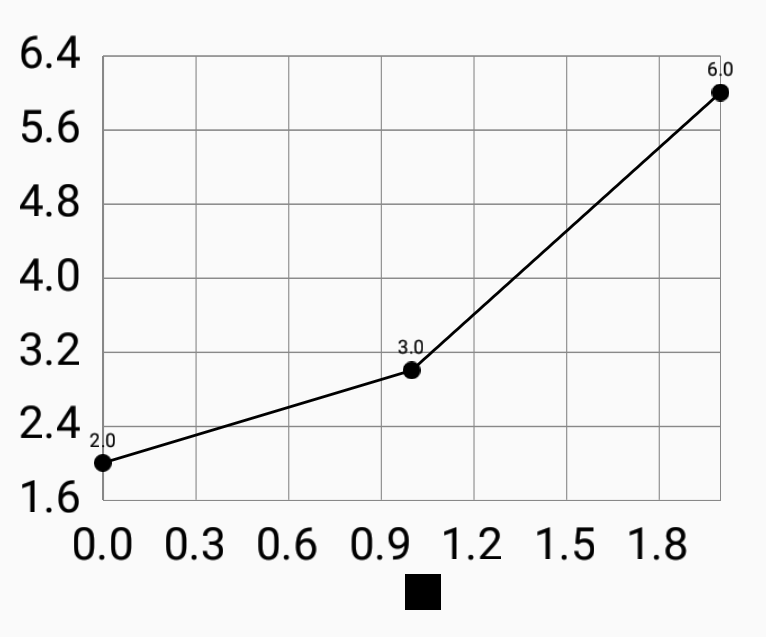
The result when starting the app is as follows:
Consider the following properties and block setup:
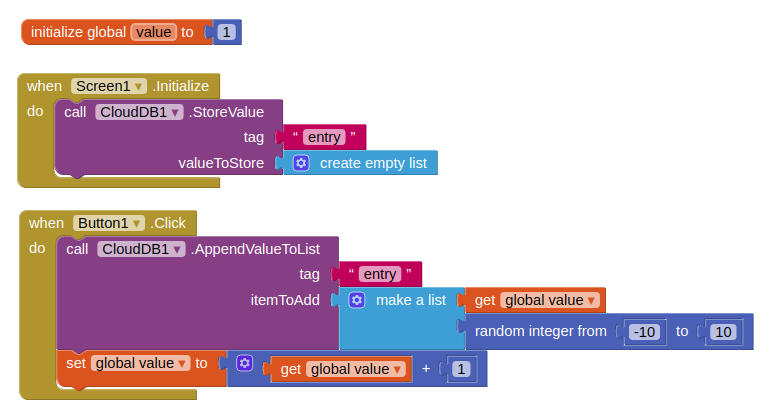
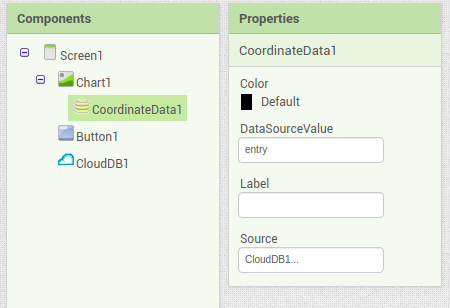
The following animation illustrates how the observed data keeps changing:

For the curious readers, the main pull requests related to these features can be found here:
This has been quite a lengthy post on the defined Data Source concepts and concrete TinyDB and CloudDB implementations. Right now, as the post is being written, the project is nearing to an end. Due to the sheer amount of work, I could not focus on blogging that much, but as the project is coming to a close, a series of blog posts are to follow documenting all the other features.
Future blog posts will detail more Chart Data Source importing options, as well as newly introduced Chart types and smaller features.
Stay tuned!
Overview In the last post, I have thoroughly covered the implemented Pie Chart type for the App Inventor Chart components project that I have been working on...
Overview Last post, I have wrapped up the implemented methods for importing data to the Charts for the App Inventor Charts project that I have been working o...
Overview In the previous post on the App Inventor Chart Components project, I have covered data importing from Files, as well as from the Web. Previously, we...
Overview In the previous post on the App Inventor Chart Components project, we have looked at an extensive description of Chart Data Source concepts and real...
Overview It has been a while since the last post due to a highly busy period! A lot of blog posts were postponed, but now a series of posts will follow in th...
Overview Following up on the App Inventor Chart components project, this blog post will focus on a specific workflow aspect that allows to select the Chart t...
Overview With the workflow for the App Inventor Chart components established, the next step is to define the concepts and format of the Data that can be impo...
Problem While working with Charts in Android using the MPAndroidChart library, one inconsistency that I stumbled upon is the fact that all the Charts support...
Overview In the last post, I have previewed the workflow of the Charts components that I am working on for App Inventor. In this post, I will dive into some ...
Overview Following up on the Chart prototypes, this post will focus on previewing the current progress on the Charts components in App Inventor.
Overview In continuation to the previous previous blog post, this post will focus on a Line Chart Component prototype in App Inventor.
Overview During the initial steps of the project to develop Chart Components for App Inventor, the major focus was on the design of the components such that ...
As the community bonding period is nearing to an end and the coding period is about to begin, I would like give a status update on what happened in the last ...
Introduction I am Evaldas Latoškinas, currently a first year Computer Science & Engineering international student in the Netherlands at TU Delft. Origina...